5 Tips to Successful Social Media Marketing 2023

By blog

1. Create a strategy

  • – Use the right social media platform suites your business
  • – Create or plan your target audience
  • – Make unique content in your industry

2. Be consistent

  • – Brand image
  • – Brand message
  • – Posting frequency
  • – Hashtags

3. Create engaging & interesting content

  • – Newsworthiness
  • – Media
  • – Storytelling
  • – Trends

4. Engagement

  • – Liking and responding to comments
  • – Live streaming
  • – Creating polls and quizzes
  • – Post content that starts

5. Track and analyze metrics

  • – Track your audience activity
  • – Analyze there accounts

20 Steps to Organically Increase Your Instagram Followers

By blog

1.Follow Your Competitors’ Followers

  • The next step is to follow their followers one by one. Those people are your target market because they already follow your competitors, which mean that they’re interested in your industry and likely what you’re sharing as well.

2.Create Interesting Content

  • Create content that your audience can relate to. The best content will depend upon your audience, so you need a clear understanding of who they are first and foremost.
  • Post about viral topics from other channels like Twitter, Facebook, and YouTube. 

3.Arrange Your Posts

  • For example, the best time for travel and tourism is on Friday between 9 a.m. and 1 p.m. while the best time for media and entertainment are Tuesdays and Thursdays from 12 to 3 p.m. 

4.Collect a List of Related Accounts within Your Niche

  • Compile a list of all competitors and major accounts on Instagram within your niche. For example, if you’re in the food and beverage industry, you might compile a list of all major food bloggers and restaurants that speak to the same audience as you.

5.Dedicate yourself by Like and Leave Comments on Competitors’   Followers Posts

  • Dedicate yourself to connecting with a high volume of followers and engage authentically as you do, leaving comments when posts stand out to you. This shows that you’re paying attention to what they’re posting and also ensures that they notice you. Ideally, many of these followers will like you what you’re sharing and follow you back—making it a simple way to organically increase your Instagram followers. 

6.Gaining More Engagement and Followers

  • An Instagram Engagement Group is a community of Instagram users who help each other in gaining more engagement and followers.
  • If one member of the group uploads a new post on Instagram, the whole group will help by liking, sharing, and leaving comments on the post. Most groups also have rules that you have to follow to participate to make sure everyone gets the most out of each post.

7.Be Consistent and Repeat

  • If you don’t want to spend money and still grow an engaged following, these methods work and are free to use. In my experience, gaining your first 1,000 followers in two months by doing this is very achievable. This means that in less than two years, you could achieve 10,000 followers without spending a penny. All while building a true and engaged audience.

8.Use Varieties of Relevant Hash Tags

  • Hashtags are still a great discoverability tool, but there’s no need to use the full 30 hashtag allowance that Instagram provides. And running the risk of one of those hashtags being blacklisted, use fewer but better-researched hashtags that clearly reflect your content.

9.Encourage Your Instagram on Your Other Channels

  • Don’t miss an opportunity to promote your Instagram account organically on your other owned channels, Such as Facebook page, which actually embeds and displays your Insta feed. Or you can create a post to announce a competition you’re running solely on Instagram, to bring your Facebook audience over to your Instagram account.

10.Tagging and Geolocation as much as possible

  • An easy way to grow your Instagram organically is to utilise the geolocation tags, if you’re working in collaboration with another brand or reposting content from someone else (make sure you get permission first!), be sure to tag them in your caption and on the photo itself.

11.Use new Stories features to keep your content fresh

  • Having a beautifully curated feed is definitely a worthwhile goal, but don’t neglect the other more spontaneous and unedited type of content that you can create with Stories. 

12.Use collabs and influencer marketing

  • Another way to get extra exposure is influencer marketing. Finding the perfect influencer for Instagram can be tricky, but, if done right, you can see a flux of new followers or even potential customers. Just make sure you choose the right person.                                                                              

13.Getting yourself featured on big accounts

  • Many of the accounts often have an email address in their bio. Take advantage of that and introduce yourself! Do NOT bombard them with emails, but rather write a casual “just saying hi, love your account, thought this could be perfect for your next post.”

14.Remove unwanted tagged photos of you from your profile

  • If you only want to feature the best user-generated content about you or your brand on your Instagram profile, you can.

15.Develop your own Instagram style

  1. Color coordinate
  • Pick 2-3 colors you know you will always use in your photos
  • Then space out your photos in your grid to balance your theme
  1. Always check the background of your photos
  • This simple tip will transform your feed: Pay attention to the background of your photos and quotes. Keep it clean.
  1. Always use the same border
  • Borders are awesome. They give space between your photos. They make your feed breathe. They are perfect if you take photos of a lot of different things with different colors. They are perfect to make your feed look cohesive, very quickly.
  1. Check Photo Quality
  • It sounds silly to include this tip. But it will make a difference to the number of likes that you will get. A blurry photo can be seen from miles away. A high quality photo looks sharp and inviting. It makes us want to DOUBLE TAP and look at the rest of your Instagram feed.

16.Get local

  • See what’s going on in a specific area (say, your neighborhood, a city you’re targeting in ads, or even an event in a certain location) by going to the search page and choosing the Places tab. Then, type in the name of the place to see all geotagged posts for that location.

17.Use Instagram Reels

  • If you’re not sharing to Instagram Reels in 2021, you could be missing out on a huge opportunity for your brand or business.

18.Create an IGTV Series

  • Create an IGTV series. This is a regular series of videos your brand will release on a schedule each week, month, or (if you really love putting out content) day.
  • If you haven’t created an IGTV channel yet, 2021 is a great time to get in the game. Think about what longer-form video your audience would be interested in and begin creating content around that.

19.Increase engagement time

  • One of the most proven method of growing your Instagram organically is to actively engage on your account.
  • That means taking the time to leave comments on followers’ posts, answering questions and reposting user-generated content.

20.Consider advertising on Instagram

  • This isn’t exactly a way to get free Instagram followers. But Instagram ads can be a powerful way to reach new followers, fast, by getting your content in front of people who would otherwise not see it.

TTF, OTF or WOFF Font format?

By blog

TTF OTF or WOFF Font format

Many different font formats you have seen, but most commonly when buying a font online you will get either one of more of the following formats:

1. OTF (OpenType)
2. TTF (TrueType)
3. WOFF (Web Open Font Format)

OTF format (OpenType .oft)

An OTF file is a font format developed by Adobe and Microsoft. It combines aspects of PostScript and TrueType font formats and is fully scalable, meaning the font can be resized without losing quality. The OpenType font format is supported by Mac OS X and Windows 2000 and later.

OTF is more likely to be a “better” font, as it supports more advanced typesetting features (smallcaps, alternates, ligatures and so on actually inside the font rather than in fiddly separate expert set fonts). It can also contain either spline (TTF-style) or Bezier (PostScript Type 1-style) curves, so hopefully you’re getting the shapes the font was originally designed in and not a potentially-poorer-quality conversion.

OTF and TTF are extensions that are used to indicate that the file is a font, which can be used in formatting the documents for printing. TTF stands for TrueType Font, a relatively older font, while OTF stands for OpenType Font, which was based in part on the TrueType standard.

Significant difference between the two is in their capabilities. TTF depends solely on glyph tables that define how each character looks while OTF is able to use glyphs along with CCF (Compact Font Format) tables. The cubic Bezier splines used by CCF allow for fewer points to be used in defining how a character would look compared to the quadratic Bezier splines used by TTF fonts. OTF also adds a few smartfont features, on top of the sfnt structure that is being used by TTF, to add additional language support to the fonts. Although it may not have a very significant effect on your computer, it is also worthy to note that the use of CCF in OTF could lead to file sizes that are significantly smaller, given that no special features are used in the font.

Main advantages of OpenType are:
1. Better cross-platform support
2. Better support for the international character sets specified in the Unicode standard
3. The ability to specify advanced typographic controls
4. File size are Smaller
5. Ability to add a digital signature to a font set to ensure the integrity of the files

TTF TrueType Font (.ttf)

TTF file is a font file format developed by Apple and Microsoft in the late 1980s as a competitor to Adobe’s Type 1 fonts used in PostScript. It used on both Windows and Macintosh platforms. It can be resized to any size without losing quality and looks the same when printed as it does on the screen. The TrueType font is the most common font format used by both Mac OS X and Windows platforms.

TTF package containing the font included both the screen and the printer font data in a single file. This made it easy to install new fonts and served as an early cross-platform font format that was usable by most consumer devices. There is really no issue for the end user as almost all modern applications that uses fonts are able to work with TTF and OTF files. Users don’t need to choose one over the other as they can be used together in creating documents or printing layouts. TTF fonts depend solely on a glyph table while OTF fonts can either have glyph tables or CCF.

Web Open Font Format (WOFF .woff)

WOFF (the Web Open Font Format) was developed during 2009 was developed by Mozilla in concert with Type Supply, LettError, and other organizations. It uses a compressed version of the same table-based sfnt structure used by TrueType, OpenType, and Open Font Format, but adds metadata and private-use data structures, including predefined fields allowing foundries and vendors to provide license information if desired.

Web Open Font Format is an open format for using fonts on the Web. People design fonts, save or convert them to WOFF and use other technologies (like HTML, CSS, SVG) to tell browsers and other software which fonts to download and apply. Until now, downloadable fonts have not been common on the Web due to the lack of an interoperable font format. Today! Adding a few lines to your CSS stylesheet links in a WOFF font and says where on your page to use it. Browsers that don’t yet support WOFF will use the next font on your list which they have installed. So there is graceful fallback. Over time, other browsers will support WOFF as well (several are in process of adding support, or have stated they will add it) and your style sheets will continue to work as that support grows.

Benefits of WOFF are: 1. Loads Faster: Font data is compressed, so sites using WOFF will use less bandwidth and will load faster than if they used equivalent uncompressed TrueType or OpenType files. 2. Improves availability of fonts to site designers: Many font vendors that are unwilling to license their TrueType or OpenType format fonts for use on the web will license WOFF format fonts. 3. Universal format for web : Both proprietary and free-software browser vendors like the WOFF format, so it has the potential of becoming a truly universal, interoperable font format for the web, unlike other current font formats.

10 Reasons Why Your Website Have High Bounce Rate

By blog

10 Reasons Why Your Website Have High Bounce Rate

High bounce rate again?
Don’t worry, Here you can find the 10 possible reasons that why your website have high bounce rate – by .

1. Too slow to load the page

In Google’s ranking algorithm they had included site speed, so as a good SEO you should be focused on it anyway. Google wants to promote content that provides a positive experience for users, and they recognize that a slow site provides a poor experience. If your page takes longer than a few seconds to load, your visitors may get fed up and leave. So loading speed is one of the main factor for increasing Bounce rate.

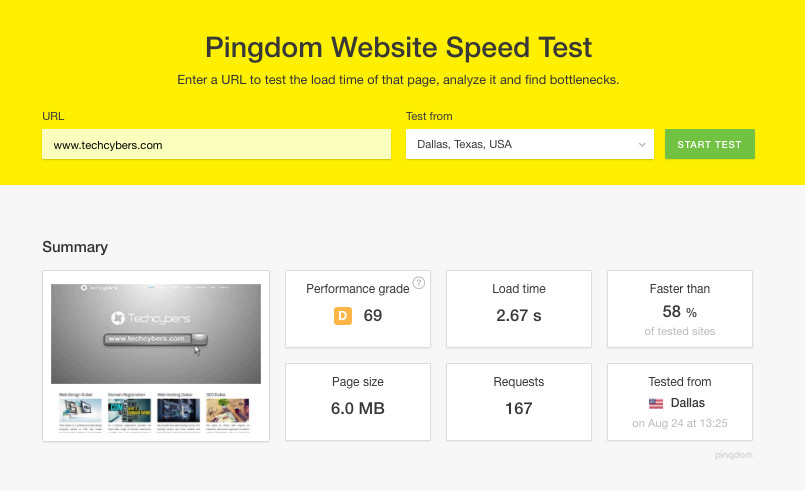
Click here to see website loading speed: https://tools.pingdom.com/#!/BSdn8/www.techcybers.com

10 Reasons Why Your Website Have High Bounce Rate

To check your website loading speed click here: https://tools.pingdom.com/

2. Poor Design and Animation

Adding too many unnecessary images and animations can cause visitors bounce away. It also makes the website slow, always make a clean and updated design and avoid using unnecessary images and animations. Think of the color design, the exact messaging you wish to spread, and the precise style which will lead users to react.

3. Your web site content is self-sufficient

In some cases, the user will get everything they were looking for from the page on your site. But the bounce rate will not be reduced. To determine whether bounce rate is nothing to worry about, you’ll want to look at the time spent on Page and Average Session Duration metrics in Google Analytics. If the user is spending a more minutes on the page, that sends a positive signal to Google that they found your page highly relevant to their search query.

If the user is spending less time that is less than a minute on the page (which may be the case of a properly optimized landing page with a quick-hit CTA form), consider enticing the reader to read some of your related blog posts after filling out the form. This helps to increase the time spent by the user in your web page.

4. Pages Contributing Disproportionally

You may have a few pages on your site that are contributing disproportionally to the overall bounce rate for your site. Google is will recognize the difference between these. So if your single CTA landing pages reasonably satisfy user intent and cause them to bounce quickly after taking action, but your longer-form content pages have a lower bounce rate, you’re probably good to go.

However, you will want to find and confirm that this is the case or discover if some of these pages with a higher bounce rate shouldn’t be causing users to leave in a large amount. Open up Google Analytics, go to Behavior > Site Content > Landing Pages, and sort by Bounce Rate.

5. Usage of Misleading Title Tag/Meta Description

Be sure that whether the title tag and meta description is the summarized form of your page content.

If not, visitors may enter your site thinking your content is about one thing, only to find that it isn’t, and then bounce back to whence they came. This causes increase in the bounce rate. To fix this either review the content of your page and adjust the title tag and meta description accordingly or rewrite the content to address the search queries you really want to attract visitors for.

7. Improper or bad Backlink from another website

The backlinks form the referring site could be sending you unqualified visitors or the anchor text and context for the link could be misleading and the users may bounce back. Unfortunately, the referring website may be trying to sabotage you with some blackhat SEO tactics, out of spite or just for fun. For example, they may have linked to your Guide to Web design tutorial with the anchor text of FREE MOVIES DOWNLOAD etc. This cause a huge amount for increase in the bounce rate.

8. Under Optimized or Low-Quality Content

Visitors to your site may be bouncing because your content is just very less or not good. If your website has high quality and unique informative content visitors mat spend more time in your web site.Take a long, hard look at your page and have your most judgmental and honest colleague or friend review it. So you can get a quality content and decrease bonce rate.

9. Hard to read – landing pages

In your web site any distracting elements can reduce the credibility of your site, which causes visitors exit and go for another option. Most common problems involve issues of legibility. For example, red cursive text on a black background will not read well, and certain kinds of fonts are also difficult to read. People scan content quickly online, so they will not want to work just to read lines of text. So always try to use a clean and readable design and attract your visitors to spend more time on your website.

10. Intrusive advertisements

Keeping certain types of banner ads in your website is also distracting, and they can reduce the amount of trust your visitors feel when on your site. Without trust, they are unlikely to provide you with email addresses, contact information, or payment info. Be careful of the kinds of ads you use: If your site is ad supported make sure that the ads are relevant to the visitor and related to the material on the page.

Like Us on Facebook:  

Follow Us on Linkedin:  

If you are looking for a based company for your website design work, then you must contact us for a better web design deal. Choosing your based company really matters for your company web design work.

2018 Website Design Trends

By blog

2017 Website Design Trends

The web site is a unique environment which is constantly changing and evolving and keeping that in mind Tech Cybers gives you a brief description about the website design trends 2017.

1. Mobile-first approach

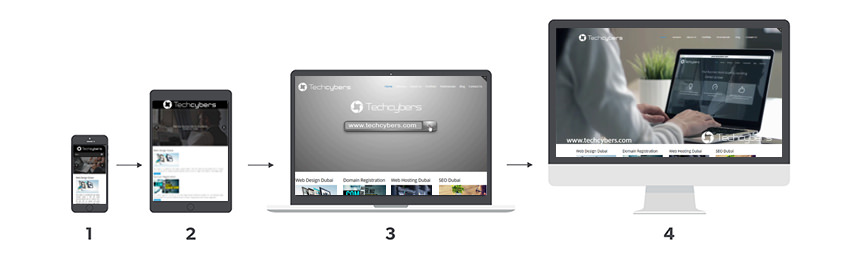
As the name suggests, mobile-first design is the process of designing for mobile (or smallest screened devices) first, then working up to the bigger ones. Nowadays mobile phones are most used devices for browsing the websites especially in Dubai. The mobile-first approach to design isn’t new to 2016 and has been around for a few years. Design and visuals aside, the mobile-first model and the restrictions it brings is a useful way for brands to really consider what their core content and message is that they want to communicate.

2017 Website Design Trends

2. Wide Layout implementation of responsive design

Responsive design is also something which has been around for a few years, what we predict to see over the coming year is an even bigger uptake in the number of brands, both big and small, who are building responsive-based sites.

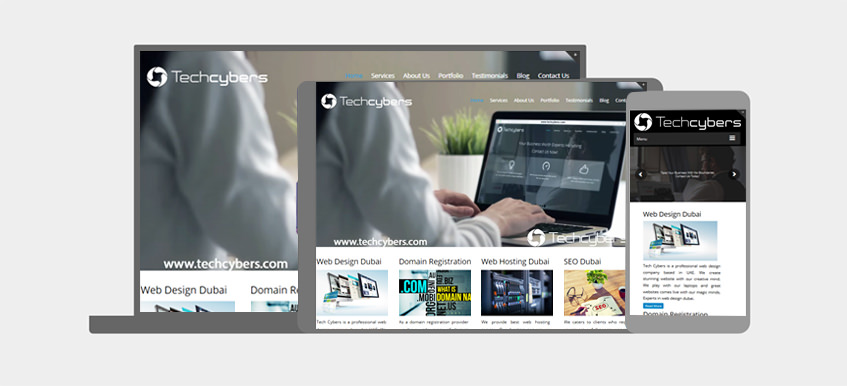
One of the main benefits of responsive design is that it allows businesses to pay for just a single site build which effectively delivers content on mobile and tablet, all the way to laptops to big-screened desktops.

2017 Website Design Trends

Rankings aside, what’s also interesting to note is how user behavior has changed over the last couple of years. Internet users have quickly taken to mobile-optimized sites which make their browsing experience easier, and any site which now doesn’t meet these standards simply won’t cut it. As this info graphic from Experience Dynamics shows, 79% of users will leave the site they’re browsing and find another if it isn’t optimised – something for brands to really consider!

3. Richer background and patterns and background images

Especially common is the grid pattern, which is treated as a “frame” for the other elements of the layout. Those elements are moved over the grid on the parallax principle and often are arranged in a chaotic manner. Usage of good and clean background images with less but informative content is a great way to attract users

2017 Website Design Trends

4. Design Frameworks and UI Patterns

What we’re starting to see more and more are both UI and UX patterns emerge across the web where many sites look and function in very similar ways as they learn from one another to hone their user’s experience. With so much online competition today for brands across all sectors, they can’t afford to take major risks in their user’s journey, and if these tried-and-tested patterns and principles work, it makes sense to use them (where appropriate!) to enhance their site.

As these existing UI and UX patterns evolve and develop, we’ll see more and more brand’s implementing them as we move one step closer to a more unified, and consistent online browsing experience.

5. Unique layouts

Over dramatic as the web-design-is-dead argument may be, you can’t blame any creative for seeking innovative ways to present content to readers. And one of the most enticing methods for breaking out of the box-centric layouts many blame responsive design for is the broken grid.

This approach seeks a way out of the meticulously aligned and “boxy” layouts we’ve been seeing a lot of lately with a variety of what might seem like visually jarring techniques.

6. Brighter color

Brighter color can attract users to your web site and it gives more clarity. Using good and clean colors can attract users. It’s not just about bright, enthusiastic color either. Gradients also came back in a big way, blending and blurring those exuberant hues into spectra reminiscent of a noonday sky or a splashy sunset.

7. Focus more on animation

Animated sliders images and content is one of the best way to give users a wonderful experience. Nowadays animated contents and images are most usually seen in the top branded web sites.The latter characteristic will become particularly important as it becomes easier to create animations.

8. Video Background

In the web development industry, large video backgrounds are considered one of the most engaging ways to portray a company’s vision, mission and capabilities. More and more video content is being generated every day, and modern internet users often tend to prefer videos and images over plain text. As such, incorporating a video background in your web design can go a long way to bringing your design to life.

The most obvious benefit of having a video background on your website is that it makes up for visual presentation in an unobtrusive manner. Videos can tell stories that can otherwise not be described using static text content. This can add to the visual experience of your website and impress your visitors.

Like Us on Facebook:  

Follow Us on Linkedin:  

If you are looking for a based company for your website design work, then you must contact us for a better web design deal. Choosing your based company really matters for your company web design work.

What is Facebook Pixel

By blog

What is Facebook Pixel

Here is a brief explanation by Tech Cybers about Facebook Pixel:

If you’re using Facebook ads—or you plan to use them in the future—there’s one key tool you should start using right away to get the most out of your social ad budget: the Facebook pixel.

Facebook pixel is an analytics tool that helps you measure the effectiveness of your advertising. You can use the Facebook pixel to understand the actions people are taking on your website and reach audiences you care about.

You can use Facebook pixel for the following:

To make sure your ads are being shown to the right people
For building advertising audiences
For unlocking additional Facebook advertising tools

facebook Pixel Helps you know to know your customer’s activity on your website easily. You can Set up the Facebook pixel by placing pixel code on the header of your website. When someone visits your website and takes an action (like completing a purchase etc.), the Facebook pixel is triggered and reports the action performed. Like this, you’ll know when a customer takes an action, and will be able to reach that customer again through future Facebook ads.

Benefits of Facebook Pixel:

1. Reach the right audience

Find new customers, or people who have visited a specific page or taken a desired action on your website. Plus, create Lookalike Audiences to reach more people who are similar to your best customers.

2. Get more sales

Set up automatic bidding to target people who are more likely to take an action you care about, like making a purchase. See how to optimize your ad sets for conversions.

3. Analyse and measure the results of your ads

Understand how successful your ad is by seeing what happened as a direct result. You can view information like your conversions and sales. Find out what data you can see from your Facebook pixel page.

To know more about Facebook Pixel click this link

If you are looking best and result driven advertisements for your business website contact us. We are based company providing high quality and .

Like Us on Facebook:  

Follow Us on Linkedin:  

If you are looking for a based company for your website design work, then you must contact us for a better web design deal. Choosing your based company really matters for your company web design work.

How to Configure Email in Android Samsung Mobiles

By blog

How to Configure Email in Android Samsung Mobiles

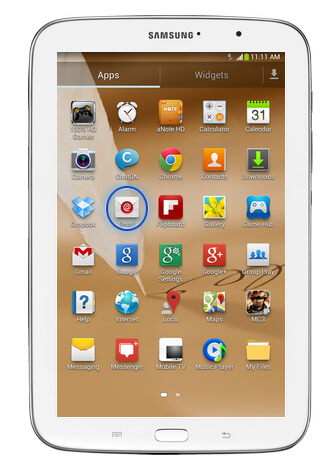
In this blog we will show you , Below are the steps to Configure Web Mail in Samsung galaxy note 8:

Step 1 :

How to Configure Email in Android Devices step 1

Step 2 :
Then Tap on Email

How to Configure Email in Android Devices step 2

Step 3 :
If you already have an , then tap on Menu, If this is the first account you are configuring then skip this step and go to step 6.

How to Configure Email in Android Devices step 6

Step 4 :
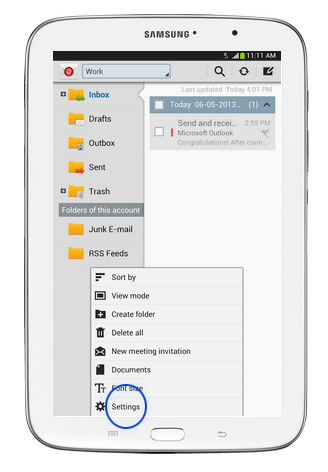
Tap on settings

How-to-Configure-Email-in-Android Devices-Step-4

Step 5 :
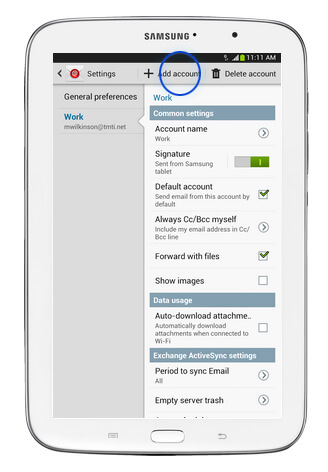
Tap on Add account

How-to-Configure-Email-in-Android Devices-Step-5

Step 6 :
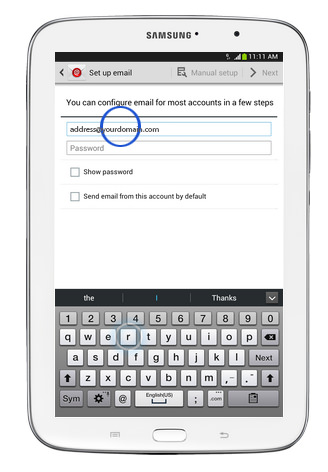
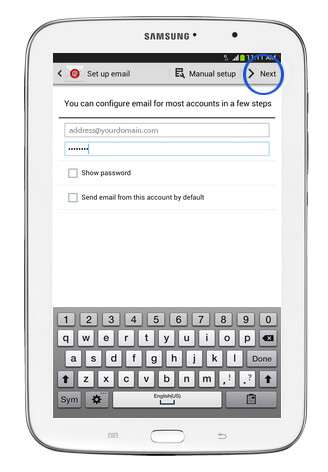
Here enter your Email address

How to Configure Email in Android Devices step 6

Step 7 :
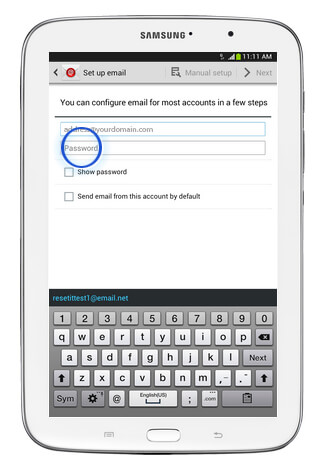
Tap on Password and enter your Email account password

How to Configure Email in Android Devices step 7

Step 8 :
Tap Next

How to Configure Email in Android Devices step 8

Step 9 :
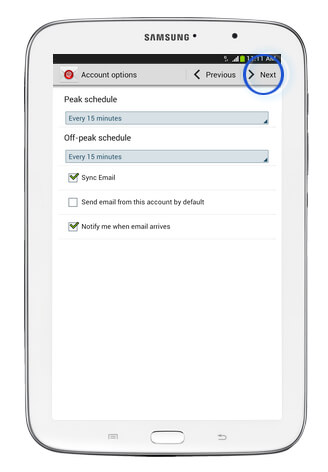
Select the required options and tap next

How to Configure Email in Android Devices step 8

Step 10 :
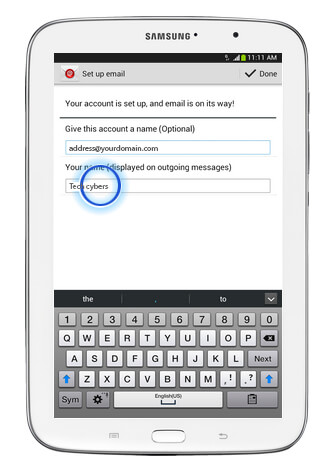
Tap on the name field and enter your name

How to Configure Email in Android Devices step 10

Step 11 :
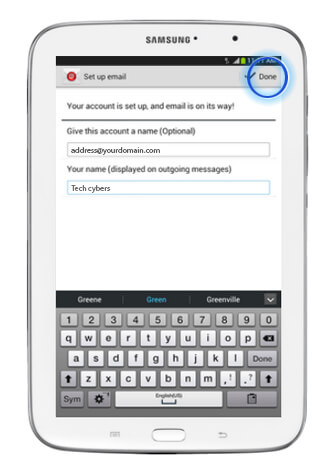
Then tap on done

That’s all This is how you .

Like Us on Facebook:  

Follow Us on Linkedin:  

If you are looking for a based company for your website design work, then you must contact us for a better web design deal. Choosing your based company really matters for your company web design work.

Google Algorithm Update Penguin 4.0

By blog

google algorithm updates

Each year, Google changes its search algorithm around 500–600 times. While most of these changes are minor, Google occasionally rolls out a “major” (such as Google Panda and ) that affects search results in significant ways. Google launched the Penguin Update in April 2012 to better catch sites deemed to be spamming its search results, in particular those doing so by buying links or obtaining them through link networks designed primarily to boost Google rankings.

Below is the official announcement by Penguin 4.0:

“In the next few days, we’re launching an important algorithm change targeted at web spam. The change will decrease rankings for sites that we believe are violating Google’s existing quality guidelines. We’ve always targeted web spam in our rankings, and this algorithm represents another improvement in our efforts to reduce webspam and promote high quality content. While we can’t divulge specific signals because we don’t want to give people a way to game our search results and worsen the experience for users, our advice for webmasters is to focus on creating high quality sites that create a good user experience and employ white hat SEO methods instead of engaging in aggressive webspam tactics.”

Updates in 2017

“Fred” (not conformed) — 8th March, 2017

“Fred” Google rolled out what appeared to be a major update, with reports of widespread impacts across the SEO community. Gary Illyes jokingly referred to is as “Fred”, and the name stuck, but he later made it clear that this was not an official confirmation.

Major Unnamed Update — 6th February, 2017

SEO Algorithm changes beginning on February 1st continued for a full week, peaking around February 6th (some reported the 7th). Webmaster chatter and industry case studies suggest these were separate events.

Major Unnamed Update — 1st February, 2017

Around February 1st to 6th there was a period of heavy algorithm flux starting and peaking around. It is unclear whether this was multiple algorithm updates or a single update with an extended roll-out, but anecdotal evidence suggests at least two updates.

Intrusive Interstitial Penalty — 10th January, 2017

In January Google started rolling out a penalty to punish aggressive interstitial’s and pop-ups that might damage the mobile user experience. Google also provided a rare warning of this update five months in advance.

Updates in 2016

Penguin 4.0 Announcement — September 23, 2016

After almost two years of waiting, Google finally announced a major Penguin update. They suggested the new Penguin is now real-time and baked into the “core” algorithm. Initial impact assessments were small, but it was later revealed that the Penguin 4.0 rollout was unusually long and multi-phase

Penguin 4.0, Phase 1 — September 27, 2016

The first phase of Penguin 4.0, which probably launched around September 22-23, was the rollout of the new, “gentler” Penguin algorithm, which devalues bad links instead of penalizing sites. The exact timeline is unconfirmed, but we believe this rollout took at least a few days to fully update, and may have corresponded to an algorithm temperature spike (113°) on September 27th.

Penguin 4.0, Phase 2 — October 6, 2016

The second phase of Penguin 4.0 was the reversal of all previous Penguin penalties. This seemed to happen after the new code rolled out, and may have taken as long as two weeks. Post-Penguin activity had one final peak on October 6th (116°), but it is unclear whether this was Penguin or a new update. Algorithm temperatures finally started to drop after October 6th.

Major Unnamed Update — 10th November, 2016

Industry chatter was high during both periods, with some suggesting that the second spike was a reversal of the first update. Google has not confirmed either event. Many people reported bad dates in SERPs during the same time period, but it’s unclear whether this was causal or just a coincidence.

Major Unnamed Update — 14th December, 2016

Many Google trackers showed massive flux around December 14-15. Webmaster chatter was heavy as well, but Google did not confirm an update.

Reasons why Google’s Penguin 4.0 update is great:

1. Penguin 4.0 is Now Part of Google’s Core Algorithm

After Penguin 4.0 update you can see that when you make changes on your site, you will see changes much faster than before. No longer will you have to wait for another rollout of Penguin to see your site recovery. In their announcement, Google actually stated that they are “not going to comment on future refreshes.”

2. Dealing with Spam Links

The good news for SEOs and Webmasters is that in the new method which Penguin 4.0 deals with spam links. This is a major improvement that many SEOs wanted because in the past if Penguin negatively affected your site, your entire site would drop in search rankings. Instead of demoting entire sites that have spam links directed towards them, Penguin will devalue the links. This means that SEOs and marketers can spend more time on creating quality content and less time trying to defend their site from spam link attacks. Google did not take away the disavow file, so you can still use it to recover from Penguin issues.

3. Avoids negative SEO

People could previously use negative SEO tactics to put at an unfair disadvantage on their competitors, but since sites are no longer demoted in the updated Penguin, this will not be possible. Because Penguin now refreshes in real-time, it does present the opportunity for SEOs to test various black hat practices and see which ones Google can or cannot detect. However, that will be much harder to do, so people should focus on building up their own sites, rather than attacking their competitors.

4. Penguin 4.0 update is more granular

Google says Penguin 4.0 update is more granular because Penguin 4.0 update devalues spam by changing ranking based on spam signals instead of demoting an entire site. Google can penalize just a specific page, group of keywords, or a subdirectory of a site, so you could find that just one page or a part of your site has been penalized instead of penalizing the entire site.

5. Avoid Black hat SEO tactics <

This Google Penguin 4.0 update is going to separate more precisely the real SEOs from the fake. These SEO agencies that are using black hat SEO tactics are going to die out because they will no longer be able to use black hat SEO strategies to get their clients to rank. Their clients are going to see their sites get hit hard and they will have to find legitimate SEOs or agencies that use best practices. This is going to be good for SEO as a whole and show companies and other marketers that not only is SEO critical to your website organic rankings, it is also important that your SEO be done right.

6. Penguin is real-time

This Google Penguin 4.0 update implies that any page’s rankings may change each time Google updates the information about this page and about pages linking to it. So, both the positive and negative impacts of your actions will become noticeable faster by Google.

7. Penguin 4.0 was released to all countries and languages simultaneously

Google released Penguin 4.0 in all the countries and languages simultaneously so that all websites will experience the same impact independent of their location the rules are the same for everyone.

8. Fast recovery from a Google penalty

If your site is penalized and your webmaster does a good job improving it and removing harmful links, then you’ll see positive results faster, right after Google revisits your website’s pages.

9. Quality content Web sites increase

Google released Penguin 4.0 will refreshes in real-time it can separate more precisely the copied or spam content so SEOs and marketers can spend more time on creating quality content and less time trying to defend their site from spam link attacks.

10. Penguin Update turns into Page-Specific

The Penguin 4.0 update hit individual web pages that contain spam content instead of blacklisting the entire website. This clearly indicates that the webmasters need to concentrate only a particular section of a website that contain spam content and fix it easily.

Like Us on Facebook:  

Follow Us on Linkedin:  

If you are looking for a based company for your website design work, then you must contact us for a better web design deal. Choosing your based company really matters for your company web design work.

Must Have Features of Websites (2017)

By blog

Must have features websites 2017

An Good website is not like a brochure, it is more like a conversation. And in a conversation, if one person does all the talking, the other quickly becomes bored so your visitors become less . Below are the by which is helpful for a good website :

1. Domain name

The first thing that your website needs is a domain name. This represents who you are, your brand, your product, and your service. It is always best to choose a domain name that ends in .com if possible Take some time to think about your domain name. Make certain that your domain name is not too long, hyphenated, or difficult to spell. A domain name should be short, representative of your website, and easy to remember.

2. Professional coding

Make sure that your website is well put-together. That means making sure that your images are loading correcting, your videos are working, and your contact form is actually redirecting to you. It’s perfectly fine if you know how to do these things, but if you don’t, ask for help from a professional.

3. Mobile friendly design

Responsive mobile-friendly design that can be used on different devices – ideally designed with mobile as the foundation

4. Quick loading

Quick loading times for users on all devices even with slow internet connections.

5. Website tracking enabled

Web analytics tracking traffic as well as goals and conversions

7. Conversion optimized

Tools for clients to create campaign landing pages with conversion in mind

8. Powered by CMS

A back-end Content Management System that enables publishing and editing content.

9. Email marketing

Email capture forms synced with client’s email marketing system 10. Social Media:
integration with relevant social media platforms

11. Strong Security

Fundamental security and privacy protocols, such as basic security checks

12. Testimonials and reviews

Must have features websites 2017

The first step is to attract people to your website. Once they are there, they will be evaluating you and your business. One of the best ways for people to get to know you is to read reviews and testimonials from your clients. Reading about good experiences from your current or previous clients can go a long way in convincing others to give your products and/or services a try.

13. Fresh content

Without a great content, your website is nothing. Your website needs to be filled with information that people will find helpful so that they will convert into your customers. All the pages should be fresh, original content with no plagiarism or copied content.

14. Use of fresh and nice images

Good images are very important to every website. Almost every people love to see lots of images as part of their online experience. Make sure that your images are the smallest size possible in order to keep your site’s load time to a minimum.

15. Call to actions

Must have features websites 2017

Nothing can replace a good Call to Action (CTA) on every page of your website. A CTA should be included several times on your homepage, both before the fold and also at the bottom of the homepage. It’s important to include your phone number and a hyperlink to your contact page.

16. Blog page

Must have features website 2017

Having a blog page is good for all the websites. Every website should have a blog page. Every website should have a blog page. Some of the main reasons for having a blog include: driving traffic to your site, converting traffic into leads, establishing authority, and driving long-term results. Having a blog page you can write blogs and post it in your page and get more visitors and followers.

17. Top navigation

Always be sure to have your navigation bar at the top of every page. When people come to your website, the first thing that they should be able to do is navigate your site. Only then can they find what they are looking for and thus become customers rather than just visitors. It’s also a good idea to have your navigation in your footer too.

18. Quick contact information

It is very important that you include important contact information on your website. This includes your location (with a map), phone number, email address, and/or contact form. This information should preferably be placed above the “fold” of your homepage, the area of the page that is visible before scrolling down.

19. Trust badges

It has been estimated that there is a 32% increase in conversion rates when trust symbols are used. There are two types of trust seals: SSL badges that prove an encrypted connection between your site and the web browser of the visitor, and images that show a relationship between its users and your website but no real security. While it’s not important to understand exactly how trust badges work, it is important that you add them to your site if possible.

20. SiteMap

Ever walked into a mall and then you are given the floor plan of the mall – where the shops are located and exit doors? That pretty much explains the sitemap. Your page sitemap shows the complete structure of your website and aids easy navigation.

How to Increase Facebook Likes

By blog

How to Increase Facebook Likes, Tips to increase Facebook Page likes

To increase engagement on Facebook, you need to create content that is not only relevant but personal too. Based on my own experience with my brand and through analyzing what other brands do, I’ll share with you some methods that have helped me to and what I’ve seen worked well for others.

1. Embed Facebook social plugins to your website

The Use of Facebook Page Plugin lets you easily embed and promote your Facebook Page on your website. Just like on Facebook, your visitors can like and share the Page without having to leave your site.

Here is the example -> Like us on Facebook:  

2. Link to your page in your email signature

Every email you send is an opportunity to link to your Facebook page. Check out the email signature tool for a creative way to link to your social profiles.

3. Promote your Facebook page on other accounts

For example, promote your Facebook Page on your website (homepage, plus header or footer), your e-mail signature, marketing e-mail footers, business cards, and all other digital marketing materials.

4. Create a memorable Facebook URL

Always create a memorable Facebook URL so that others should easily remember. And the URL should be your company name or related.

5. Be always active

People are unlikely to like your Facebook page if you don’t post regularly. so try to post regularly. Post at peak times when your audience is online and experiment with the timing of your posts to gauge when the majority of your followers are engaging with your content.

6. Always post epic content

Posting awesome content is a great way to get your page to spread More. Infographics are highly shareable and get great results.Watermark your images to get traffic if your content is shared outside of Facebook. Link to your fan page in the description. Be the first to share your content to a few relevant groups after you post it.

How-to-increase-Facebook-like

7. Comment and share pages that are in your businesses space

You can go to Facebook and search the business you are in and comment on articles or things they publish. The admins of the page will end up recognizing your name and end up liking your page over time.

8. Invite your existing community

You have a community that’s easily within reach: employees, current customers, business & industry partners. Send a friendly personal invitation to ask them to like your company’s Facebook Page.

9. Add a link on your personal profile

If you want to promote your Facebook page within your Facebook friends, just under your photo on your personal profile there is a section to write something about yourself.Here you can a link to your fan page.

10. Upload videos to your Facebook page

Facebook videos are very underrated, and can provide a great way to drive traffic and Fans to your page if your video content is compelling enough for people to share it.When you embed a Facebook video on another website this video includes a watermark link in the top left corner to the fan page it came from.

How to increase Facebook likes

11. Use the share button

The Share button is all over Facebook and is a very handy feature. It only works for sharing on your personal profile. So periodically go to your fan page, scroll toward the bottom left column and click the “Share+” button. Add a compelling comment along the lines of exciting news, recent changes, special incentives, etc., happening on your fan page and invite your friends to join if they haven’t already.

12. You can use social media monitoring to measure, analyze, and learn

Use Facebook Insights to find useful metrics on your Page performance. You can view metrics like reach, number of engaged users, engagement rate, and new Page likes. These metrics will help you understand what’s driving your likes and engagement, so that you can adjust your posts accordingly.

13. Place Facebook ads

Even with a small weekly/monthly budget, you should be able to boost your followers count using Facebook’s own social ad feature. It’s the most targeted traffic your money can buy. To buy an ad, scroll to the foot of any page inside Facebook and click the link at the very bottom that says “Advertising.” From there, you can walk through the wizard and get an excellent sense of how many Facebook users are in your exact target market.

14. Keep posts simple

Some ways to do this while
Ask Questions
Post Fill-in-the-Blanks
Post Photos
Talk About the News
Ask for Likes
Target Different Fans
Talk About Facebook

15. Use beautiful images

If you’re trying to get , images are great to tell stories quickly & powerfully and thereby get more exposure in the news feed. And if you take the time to brand your photos with your company’s logo, everyone who sees your great pic on Facebook will know it’s coming from you.

16. Know your audience

The better you know your audience the easier it will be for you to target your content and get great results.Click the insights chart on your Facebook page admin panel to access your demographics.

17. Get people to join Your page via SMS text messages

Send a text message to 32665 (FBOOK) with the words “fan yourusername” OR “like yourusername” (without the quotes).

18. Link to Twitter

Link your Twitter account to your Facebook fan page and automatically post your Facebook content to Twitter. You can edit what gets posted, choosing from Status Updates, Photos, Links, Notes and Events.

19. Add promotional business cards that link to your Facebook page

Business cards are cheap & effective, that is why nearly all business people use them to this day.Throw a link to your Facebook Page on your card and some people will certainly check it out.

20. Add link to your Facebook page from your LinkedIn profile

LinkedIn gives every user three slots for links to whatever you’d like right on your profile. You can make the anchor text of these links whatever you like, so I recommend using a call to action such as: Join my Facebook page etc..

21. Invite your Facebook friends to like your page from invite option.

Inviting your friends to like your page is the most simple and easy way to increase your page likes.

22. Love your followers

There’s nothing like some fan love to get your community talking! Share the posts & content your Followers leave on your page.

23. Give an awesome Facebook page experience

Do your best to deliver an awesome experience for those who interact with your page by creating and posting epic content.The viral feedback this can send into many peoples Facebook news feed will enable you to pull in many new free fans for your page.

24. Watermark your Images & Videos

Always add watermark to your images and videos that you post on the Facebook Page. Adding watermark is a great way to get your page to spread More and .

How to increase Facebook likes

25. Fill complete details on your Facebook page Info

Make sure your brand’s images and description are engaging, encapsulate what your company does, and encourages people to like your page. Make sure you fill out as much of your Page Info as you can. Select the categories and subcategories that best describe your company, include your website URL, list your address, phone number, and hours of operation (if applicable). All of this information will help your page appear in Facebook & Google search when people are looking for companies like yours, which can even more!

26. Ask all your company staffs to like your page.

Another best way to increase likes to your company page is just ask all your company staffs to like your page. And ask them to invite their friends to like it.

The above 26 tips from Tech Cybers will give you exact information about

Like Us on Facebook:  

Follow Us on Linkedin:  

If you are looking for a based company for your website design work, then you must contact us for a better web design deal. Choosing your based company really matters for your company web design work.

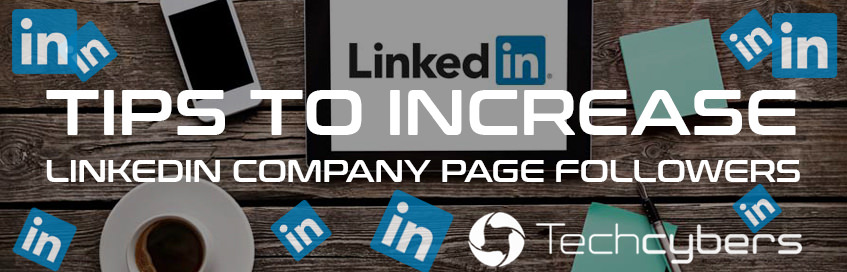
How to Increase LinkedIn Followers

By blog

How to Increase LinkedIn Followers, Tips to increase linkedin followers

LinkedIn Company page helps you to improve your business. Below are the points which you can follow to

1. Add LinkedIn “Follow” Button to your website

Adding A LinkedIn “Follow” button on your website and blog will make it easy for people to follow you on LinkedIn. Preferably add this follow button at the footer of your website which will repeat all the pages of your website. Not recommended to add at the top of the page script as it will effect loading speed.

Here is the example ->

Follow Us on Linkedin:

2. Engage your employees to join LinkedIn and ask them to add your company as their workplace.

Encourage your company employees to create and complete LinkedIn profiles – once they include your company name, they automatically become followers of your Company Page. Encourage them to create and complete LinkedIn profiles – once they include your company name, they automatically become followers of your Company Page.This will help to drive more traffic to your page.

3. Promote on other social media pages

You could ask your Twitter followers or Facebook fans to follow your LinkedIn page. Give them the link and add an attractive call-to-action. This can

4. Take part in LinkedIn groups

Joining in LinkedIn groups is an effective way to highlight your Company Page and attract more followers. You can launch your own discussions, or you can contribute to popular discussions that other members have created. Join groups that are relevant to your business and actively participate in discussions by sharing your insights and thoughts so that people get to know you and will be tempted to check out your profile and page.

5. Always Try to include images in your page posts

Adding good Images will attract more attention leading to and visibility.

How to get linkedin followers2

6. Promote your company page outside

Add a link to your page in company communications like mails, emails, newsletters etc. Invite other people such as your customers and key audiences to follow your page.

7. Engage with followers and connections first

There is no point in trying to get more followers if you’re not engaging with your already existing followers and connections. Start by regularly liking and commenting on other people’s posts and sharing them.

8. Analyse your LinkedIn analytics and optimize your content for maximum traffic

Check your LinkedIn analytics to know which kind if posts attract more audience and optimize your content accordingly to get more engagement and maximal Traffic.

9. Share YouTube videos in your posts

Add links to YouTube videos in your posts. According to LinkedIn, followers who engaged with such posts take “twice as many amplification actions (likes, shares, and comments)” as they do with posts without videos.

10. Use your full company name as your LinkedIn page name

This will help people to find your page when they search for it using Google Search or on-site search.

11. Share your company news on your LinkedIn page

According to LinkedIn, a huge percentage of LinkedIn members are interested in company news.

12. Add post on your page at least 20 times in a month

LinkedIn study found that Posting quality content regularly will keep your followers interested and will bring in new followers.

13. Post useful and quality content

Add posts which are useful and quality content to your company page before you ask people to follow so that they find it enticing enough to follow it. Then regularly keep sharing interesting and useful information, updates and links on your page to keep them interested.

14. Ask your employees to engage with your company page content

Such activities on your page will gather the interest of people who visit your page.

15. Always Fill out your complete company profile

LinkedIn gives more preference to companies with complete profiles in their on-site search.

16. Add more attractive cover image or logo to your LinkedIn company page

This will always help you to capture the attention of visitors.

17. Try to post your updates during busiest hours

LinkedIn’s busiest hours are in the morning and midday from Monday to Friday. This will ensure your post to get maximum reach.

18. Add links in your page posts

Include links in your LinkedIn page posts wherever possible because posts with links generate more traffic compared to posts without links.

19. Optimize your LinkedIn page for search engines

Include relevant keywords in your description and in your posts (especially longer, content-heavy posts that tend to do well in search).

20. Add multiple admins to your company page

Assigning multiple admins They can split the content creation and other work for various products and/or lines of business. Encourage them to post engaging content on the page regularly and share it with their connections.

21. Focus on trending topics for content

Adding posts on trending topics will attract more clicks. You can look up popular topics on social networks such as Facebook, Reddit etc.

22. Post content what Linked members are interested in

Try to know what members are interested in and they engage . So you can get more amplification to your posts

23. Post regularly

Try to add post regularly on LinkedIn Pulse to get more visibility.

The above 23 tips from Tech Cybers will give you exact information about

Like Us on Facebook:  

Follow Us on Linkedin:  

If you are looking for a based company for your website design work, then you must contact us for a better web design deal. Choosing your based company really matters for your company web design work.

Features of WordPress Content Management System (CMS)

By blog

Features ofWordPress Content Management System CMS

 make it easier and less admin intensive to manage your site.CMS supports the creation and modification of digital content using a simple interface to abstract away low-level details unless required, usually supporting multiple users working. You will not need any special skills or training to use this CMS to add content, change pages, upload images and perform all your website maintenance quickly and easily.

If you can use Microsoft Word then you can use CMS. There’s no need to know how to code, upload pages or worry about design inconsistencies.  CMS makes it easy for you to quickly add new pages, turn features on or off and update your site without hassle.

Some of the are listed below:

  • Easy management
  • Minimal server requirements
  • Admin panel with multiple language support
  • Create new pages with ease
  • Automatically handle updates to key areas
  • Turn features on or off more easily
  • Module based design
  • Easy Image and Media Management
  • Social Integrations
  • Open Source
  • Group-based permission system
  • Multiple content areas on one page

Today WordPress powers more than 24% of the web – a figure that rises every day.WordPress is the leading choice of web developers and independent users because of one key reason – it offers streamlined features, enhanced search engine optimization and a striking visual appeal all rolled into one.WordPress combines simplicity for users and publishers with under-the-hood complexity for developers. This makes it flexible while still being easy-to-use.You do not need a full time web master to manage your website when you can get optimum functionality by our custom designed Content management system. WordPress is convenient to use, requiring zero technical expertise and fully customizable.

Some of the key you may know:

  • Simplicity
  • Flexibility
  • Handle with Ease
  • Built-in Comments
  • Search Engine Optimized
  • Multilingual
  • User Management
  • Easy Media Management
  • Large Community
  • Easy Menu Management

Like Us on Facebook:  

Follow Us on Linkedin:  

If you are looking for a based company for your website design work, then you must contact us for a better web design deal. Choosing your based company really matters for your company web design work.

Why to Update your Web Browser

By blog

Why to Update your Web Browser

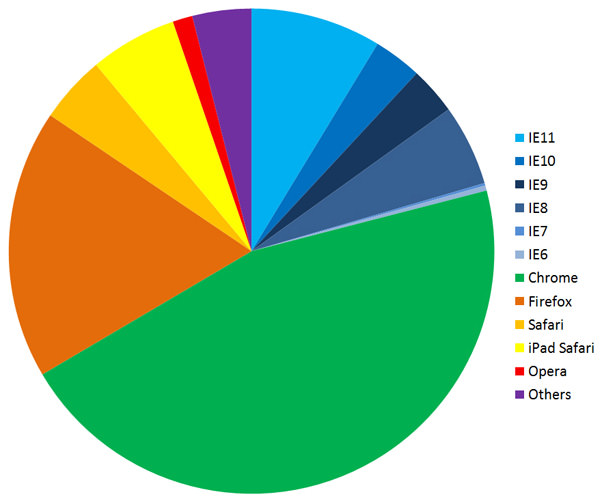
is the tool you use to view websites on the internet. There are a number of browsers available, with the most popular being Google Chrome, Firefox and Internet Explorer. But It’s strongly advisable to use the most versions to get the best and most secure browsing experience.

Why- to Update your Web Browser

From the chart above, you can clearly see that Google Chrome is the leading browser, with nearly 50% of users. Firefox and Internet Explorer have more or less the same share with around 17% and 20% respectively. Apple’s browser Safari, is growing in popularity with the increase of iPhone and iPad users, as this browser is installed on their device.

Security vulnerabilities

If you are using an outdated browser then you are putting yourself at risk from a number of security threats. Internet Explorer 6, 7 and 8 are less stable and more vulnerable to viruses, spyware, malware and other security issues.

Performance issues

Older browsers tend to have lots Performance issues. First of all, you may find that images usually have a slower loading speed. This can be frustrating and creates a poor user experience. Also even worse, older browsers have a higher tendency to crash, which is exactly what you don’t need after nearly completing a long online form!

Compatibility and display problems

If you are using an outdated browser version your web site will have lots of display problems. Websites should display consistently across all browses. Optimization of a website across browsers – so that it looks the same and works in the desired way – can sometimes be difficult, particularly when it comes to the multiple versions of Internet Explorer (IE).

Support of newer web technologies

Older browser version does not support many of the latest technologies. Web technology moves at a very fast pace and new technologies are constantly being adopted by developers. In the last 5 years or so, HTML5 and CSS3 have emerged and become widely adopted across the web. These new technologies have created many exciting new possibilities, however they have been held back by the lack of support on older browsers.

Responsive design issues

Old browsers can be limited for responsive sites, meaning if you happen to be using an outdated browser, you may find responsive websites don’t display correctly.

Like Us on Facebook:  

Follow Us on Linkedin:  

If you are looking for a based company for your website design work, then you must contact us for a better web design deal. Choosing your based company really matters for your company web design work.

Difference between JPEG and PNG

By blog

Difference-between-JPEG-and-PNG

is a standardized image compression mechanism. JPEG files can be relatively small in size, but they still look crisp and beautiful. Jpeg image format supports up to 16.7 million colors, which makes them the right choice for complex images. It works well on photographs, naturalistic artwork, and similar materials. JPEG is “lossy”, meaning that the image you get out of decompression isn’t quite identical to what you originally put in. The algorithm achieves much of its compression by exploiting known limitation of the human eye, notably the fact that small color details aren’t perceived as well as small details of light-and-dark. Thus, JPEG is intended for compressing images that will be looked at by humans.

With the wide range of colors, you can have beautiful imagery without a bulky file size. With new responsive techniques, you can also have flexible images without large loading times. For good-quality, full-color source images, the default quality setting (Q 75) is very often the best choice. Try Q 75 first, if you see defects, then go up with it.

format is superior to GIF in that it has better compression and supports millions of colors. PNG files end in a .png suffix. Designers need the ability to incorporate low-resolution images that load quickly but also look great, too. This is where PNG image format introduced. PNG-8 does not support transparency, but PNG-24 and PNG-32 do. PNG transparency is different from Gif transparency, because they can have different levels of transparency.

PNG files are tight, which means that they do not lose quality during editing. This is unlike jpegs, where they lose quality. PNG files tend to be larger than jpegs, because they contain more information. But PNG files do not support animation.

Like Us on Facebook:  

Follow Us on Linkedin:  

If you are looking for a based company for your website design work, then you must contact us for a better web design deal. Choosing your based company really matters for your company web design work.

Why WordPress?

By blog

Why-WordPress

Often People ask us: Isn’t my old site good enough? Here is the answer for such questions. WordPress is that it’s easy to use and flexible enough for just about anything.

That’s the main reason why WordPress has grown so much in popularity. According survey, WordPress powers 22.5% of all websites on the internet. Because of it’s robust features, many of the top brands use WordPress for their websites such as Time Magazine, Facebook, Sony, Disney, LinkedIn, The New York Times, CNN, eBay, and more.

WordPress is Open Source

Due to the nature of open source, WordPress is a community software. It is maintained by a large group of expert’s majority of whom are WordPress consultants with active interest in growing and maintaining WordPress. By using WordPress you become part of that awesome community.

Easy to Manage 

Today WordPress is used by millions of people and almost every day new people are joining the WordPress community. WordPress iis fairly easy to use this is the reason why people quickly adapt to it. WordPress makes you easy to customize because it has its own options panel allowing you to manage content of your website.

WordPress is SEO Friendly 

WordPress is written in a standard compliance high quality code and produces semantic mark up which makes your site very attractive to search engines. By design WordPress is very SEO friendly, and you can make it even more SEO friendly by using Your own skills.

WordPress is Safe and Secure 

WordPress is developed with security in mind, so WordPress is considered quite safe and secure to run any website. However, just like the real world, the internet can be an uncertain place.

Easy Handling Different Media Types

WordPress is not just limited to writing text. It also comes with built-in support to handle images, audio, and video content. You can also use for document or file management.

WordPress also makes you to Import contents from social media into your website.

Like Us on Facebook:  

Follow Us on Linkedin:  

If you are looking for a based company for your website design work, then you must contact us for a better web design deal. Choosing your based company really matters for your company web design work.

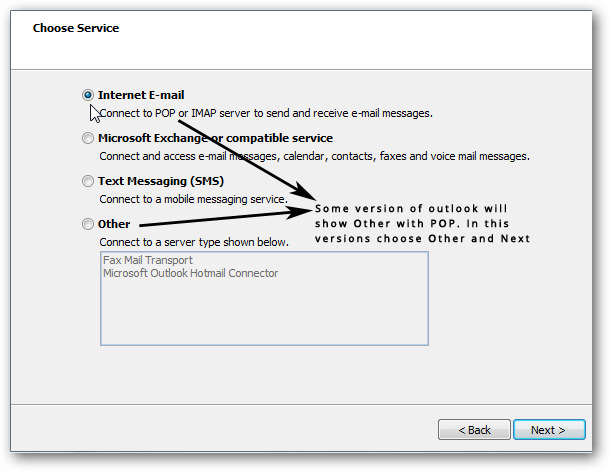
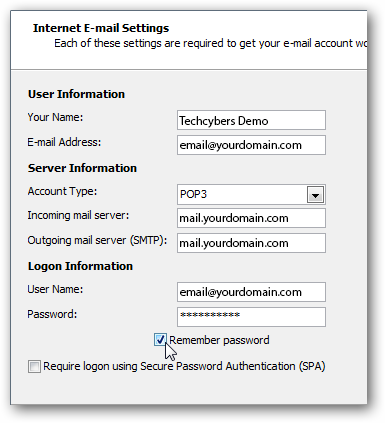
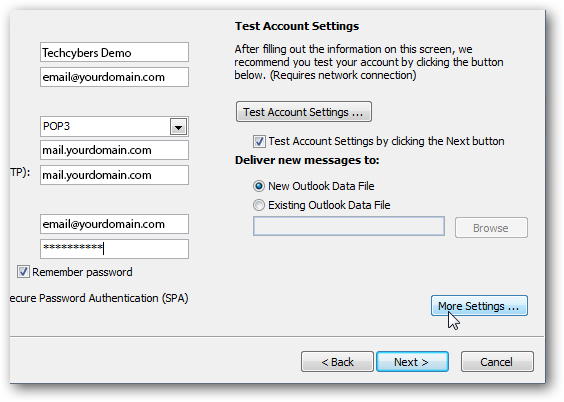
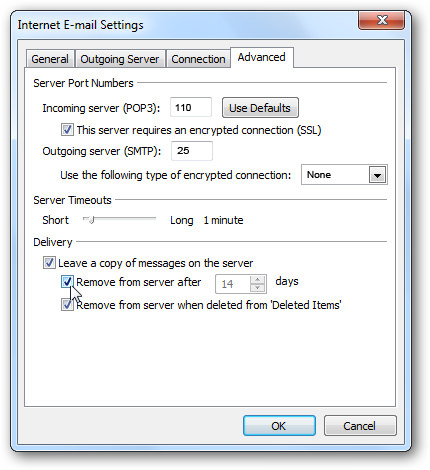
How to change from IMAP to POP3 account

By blog

Converting from an IMAP account to POP3 account will mitigate the server from administering the emails of user. Reason being with POP3 account, mails gets saved on the user’s system locally. The conversion of IMAP account to POP3 accounts is mentioned clearly in the following steps.

Step 1. Add a POP3 Account

To add a POP3 Account Please see Our blog in few clicks

After Adding POP3 Account Please follow the steps below

Step 2: Move the Mail Folders

After the user’s account has been added as a POP3 account, all the emails which are present in the Inbox folder of the IMAP account will start downloading. But, the contents from sent items and additional sub-folders created by users won’t get downloaded. It is because POP3 protocol provides for downloading the messages from the inbox folder only.

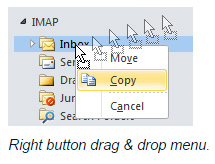
To Move your data, simply select the messages or folders that you want to have in your POP3 mailbox and initiate a copy or move command or use the drag & drop method. If you drag & drop mails or folders via your right mouse button, you’ll get an option to either move or copy the selected items.

Note -> You cannot move or copy the Inbox or Sent Items folders since these are special folders. To move these items, you’ll have to select the messages instead of the folder.

How to change from IMAP to POP3 account step 2

To keep the original structure of messages intact, users can first clear out the contents of POP3 account. The status of all the messages like read or unread will remain unchanged even after transferring the contents to the new account. This act is done to avoid any duplicate messages in the inbox.

The smoothest way to move the Calendar items at once is by placing Calendar folder in a list view. For example- All Appointments list view or category view. Then move the items by selecting them (via CRTL+A) and then apply drag & drop option.

Step 3. Remove your current IMAP account

After all the messages are copied to POP3 account mailbox, the IMAP account can be removed by accessing the Account Settings option.

In case of Outlook 2013, proper steps should be taken to ensure that the PST file of the POP3 account is placed as default store before aiming to remove the IMAP account. This can be done by selecting “Data” option, then choose POP3 mailbox store that contains the PST file and finally click on the option “Set as Default.”

It should be noted that it is mandatory to restart the system in case of Outlook 2013 while switching the default mailbox store from IMAP to POP3 account. After the system restarts, users can move to the Account Settings option again and remove the IMAP account successfully.

Like Us on Facebook:  

Follow Us on Linkedin:  

If you are looking for a based company for your website design work, then you must contact us for a better web design deal. Choosing your based company really matters for your company web design work.

How to setup domain based emails in apple mail: POP3

By blog

In this blog we will provide you with detailed instruction on how to configure your Email account to work on your Mac Mail application.

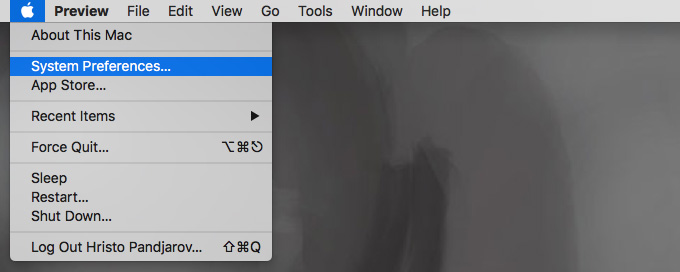
Step-1. Click on the Apple Icon Menu on the top left of your screen and select the System Preferendces… submenu.

How to setup domain based emails in apple mail POP3 step 1

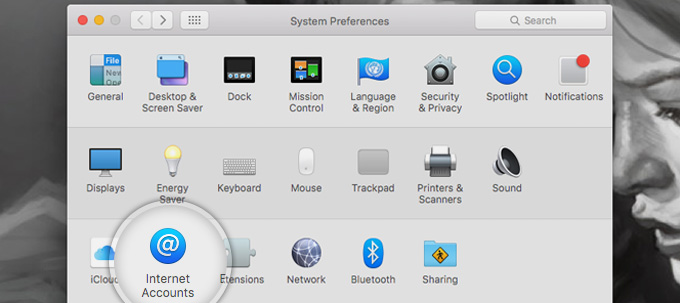
Step-2. You will be taken to your System Preferences screen where you can adjust various options of your Mac OS. Select the Internet Accounts link to proceed.

How to setup domain based emails in apple mail POP3 step 2

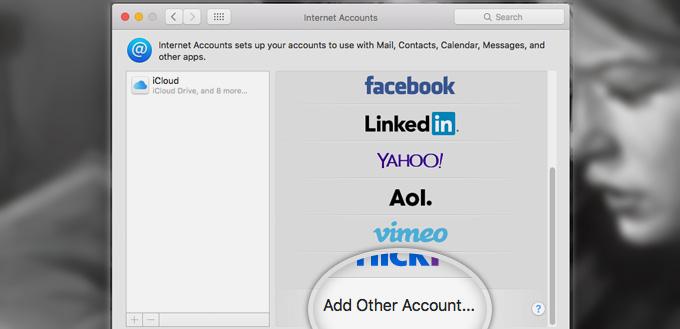
Step-3. You will see a list of all the different accounts you have registered including iCloud, FaceBook, Vimeo, etc. Scroll down and select the Add Other Account… option.

How to setup domain based emails in apple mail POP3 step 3

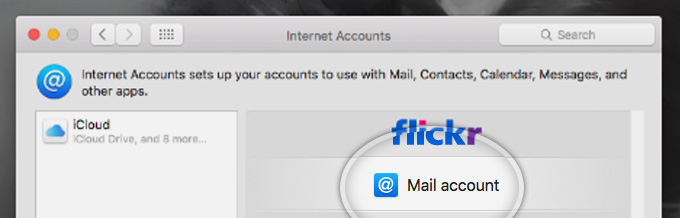
Step-4. Then select to add a Mail account on the next screen

How to setup domain based emails in apple mail POP3 step 4

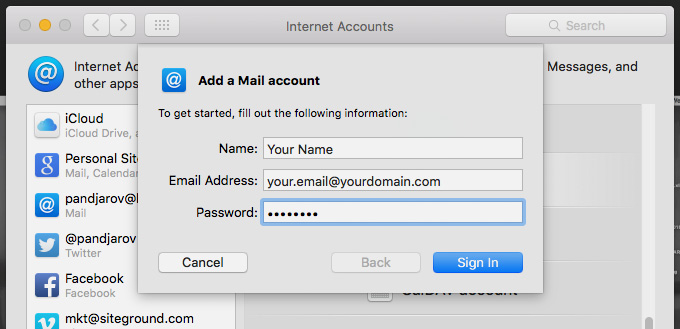
Step-5. Here you will see a popup asking you to fill in your name and the Email address that you want to register with Mac Mail. Note, that people you send emails too will receive them from the name you enter here. This option, however, can be changed later on. Finally, click Sign in to proceed.

How to setup domain based emails in apple mail POP3 step 5

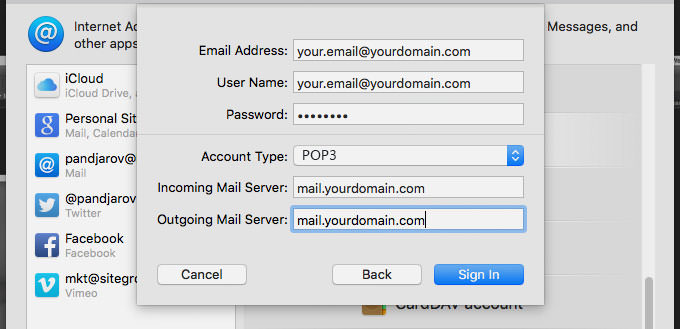
Step-6. Here, you have to fill in the server settings for your Email account:

Email Address: – should be pre-filled with the value you’ve entered in the previous screen
Username: – enter your full email address as username. It will be used both for the incoming and outgoing connection
Password: – enter the password for your email account
Account Type: – it’s set to IMAP by default. Unless you specifically want to use POP3, please leave it that way
Incoming Mail Server: – add mail.yourdomain.com unless you have a specific MX records configuration for your domain name
Incoming Mail Server: – same as the incoming server

Once you fill in all the details, press Sign In to proceed.

How to setup domain based emails in apple mail POP3 step 6

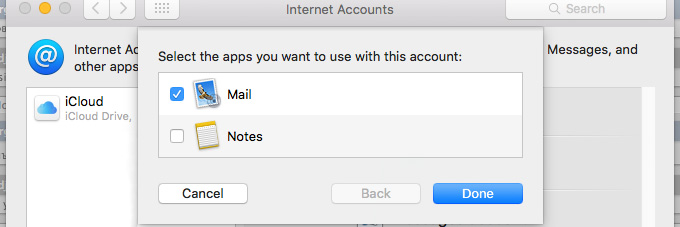
Step-7. At last you will be asked which programs you want to use this account with. The available options depend on the applications you have installed on your account.

How to setup domain based emails in apple mail POP3 step 7

Now use your email account with the Mac Mail application!

Like Us on Facebook:  

Follow Us on Linkedin:  

If you are looking for a based company for your website design work, then you must contact us for a better web design deal. Choosing your based company really matters for your company web design work.

How to create email accounts using cPanel

By blog

In this blog we will show you for one of your domain names.

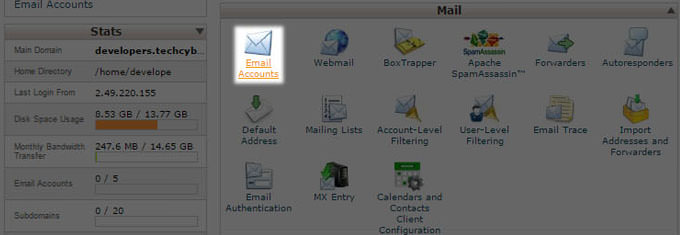
Step-1. Login to cPanel and click on the Email Accounts icon located in the MAIL section.

How to create email accounts using cPanel step 1

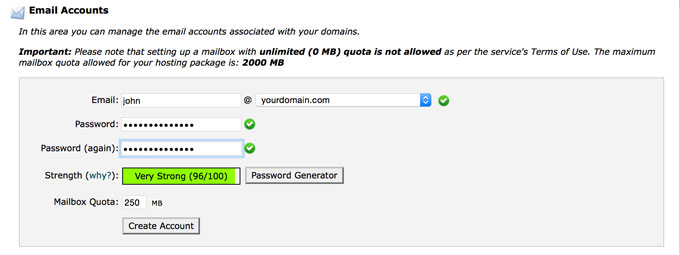
Step-2. Type in the new Email account you want to create and fill the necessary information for it.

How to create email accounts using cPanel step 2

> Email – Enter the email address to create email accounts using cPanel. Note, that you can choose only from domains, associated with your account – your primary domain and all addon and parked domains.

> Password – Select a strong password for your new email account. The password strength meter will help you make it secure enough.

> Mailbox Quota – Choose the size of the mailbox. Note, that different accounts have different maximum mailbox size. You will see a note with your specific limitation above this field.

Once you’re done, press the Create Account button at the bottom. That’s it, in few seconds, your new will be created.

Like Us on Facebook:  

Follow Us on Linkedin:  

If you are looking for a based company for your website design work, then you must contact us for a better web design deal. Choosing your based company really matters for your company web design work.

How to Add Business to Google Maps?

By blog

If you’re an established business, chances are your business already exists in the Google My Business directory and you’ll just need to claim it. New businesses or new locations will probably have to be added.

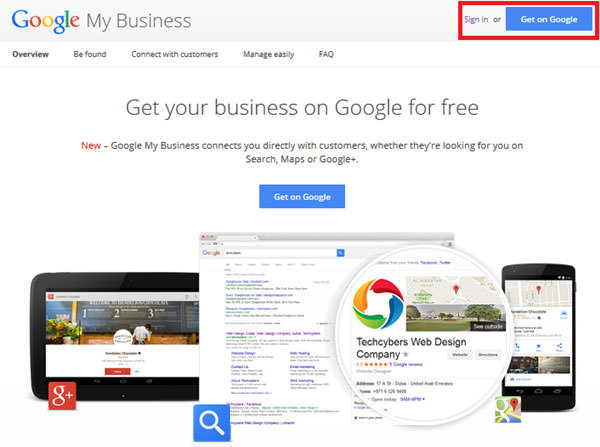
Step-1. Go to Google My Business.

Select “Get on Google”

How to Add Business to Google Maps

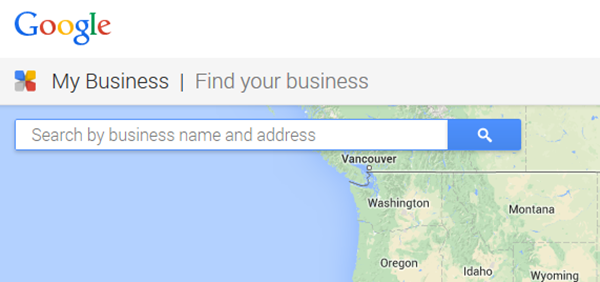
Step-2. Enter Your Business Name and Address in the Search Box.

How to Add Business to Google Maps step 2

Step-3. Select or Add Your Business.

Click on your business listing if it appears among the suggested matches. If not select “Add your Business”, and provide the necessary information.

TIP: Determine how you want your business Name-Address-Phone Number (NAP) to appear across the web and use that NAP here (i.e. Will you spell out S-t-r-e-e-t, or use St.?) The address that you use here should become your default address across the web. Consistency is important.

As you answer questions, remember that the more specific and accurate the information Google has about your business, the better it will be able to correctly classify and display your business listing.

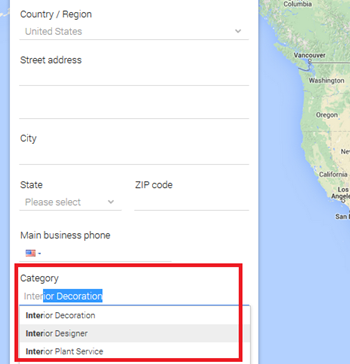
Category Selection

Near the bottom of the form, you will be asked to choose a Category that describes your business.
The category selection is very important as it is essentially the way Google will classify your business, and the type of search query it will display your listing for.
Google has preset Categories, or keywords, for each industry. Start typing your keyword in to see if Google produces a match, then select the best one. You will get a chance to add more categories later on (up to 5).

How to Add Business to Google Maps step 3

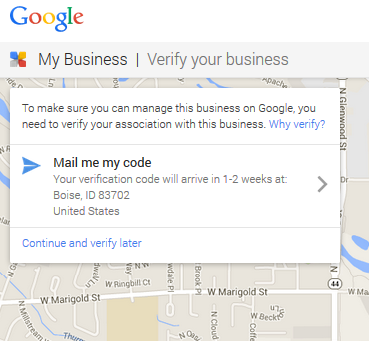
Step-4. Verify Your Business

Google will want to verify that your business is located where you say that it is. This usually means waiting 1-2 weeks for a postcard with a verification PIN.

How to Add Business to Google Maps step 4

Occasionally you’ll be given the option to receive your PIN by text message or or automated phone call – take it – it’s much faster and easier!

TIP: If you do have to wait on a postcard, remind anyone that handles the mail to be on the lookout for Google Verification Postcardit, then try to verify it as soon as you get it (you have 30 days). You’d be surprised how often businesses have to go through the verification process 2 or 3 times because someone threw the postcard away or forgot to use it once they received it.

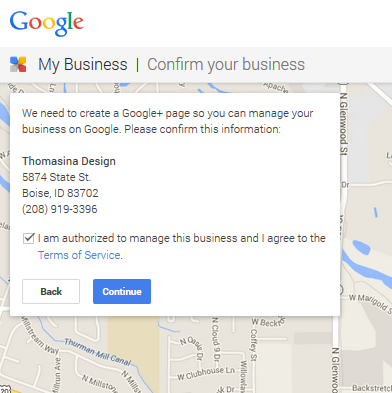
Step-5. Confirm your Business. Set up a Google+ Page.

How to Add Business to Google Maps step 5

Setting up your Google My Business page is the first step in Local Search Optimization, and should be a high priority for all businesses hoping to be found online.

Like Us on Facebook:  

Follow Us on Linkedin:  

If you are looking for a based company for your website design work, then you must contact us for a better web design deal. Choosing your based company really matters for your company web design work.

WordPress Security Tips

By blog

What is Security?

Fundamentally, security is not about perfectly secure systems. Such a thing might well be impractical, or impossible to find and/or maintain. What security is though is risk reduction, not risk elimination. It’s about employing all the appropriate controls available to you, within reason, that allow you to improve your overall posture reducing the odds of making yourself a target, subsequently getting hacked.

Table of contents

1. Should not use admin as a username
2. Use a less common password
3. Add Two-Factor Authentication
4. Employ Least Privileged principles
5. Hide wp-config.php and .htaccess
6. Use WordPress security keys for authentication
7. Disable file editing
8. Limit login attempts
9. Be selective with XML-RPC
10. Hosting & WordPress security
11. Stay up-to-date always
12. (Free) plugins & themes
13. Understand File and Folder Permissions
14. Backup, Backup, Backup

WordPress itself has a list on you might want to read. Of course, some of the things in that list will be repeated in the article below. We prefer a more hands on list and direction, that’s why we decided to write this article.

Should not use admin as a username

This is perhaps the easiest baseline step for you can take as a WordPress user. It costs you nothing, and the install makes it really easy to do. A majority of today’s attacks target your wp-admin / wp-login access points using a combination of admin and some password in what is known as Brute Force attacks. Common sense would dictate that if you remove admin you’ll also kill the attack outright.

The argument exists that the attacker can still enumerate the user ID and Name and can in some instances pull the new username. There is no denying this. Remember though, Security is not about risk elimination, it’s about risk reduction.

For the everyday, automated Brute Force attack, removing the default admin or administrator username will already help a lot. You’re at least making it a bit harder for the hacker to guess the username. For the sake of clarity, understand that when we say “admin” we are speaking specifically to the username only and not the role.

Simply create a new user in WordPress at Users > New User and make that a user with Administrator rights. After that, delete the admin user. Don’t worry about the post or pages the admin user has already created. WordPress will nicely ask you: “What should be done with content owned by this user?” and give you the option to delete all content or assign it to a new user, like the one you have just created.

Use a less common password

An easy thing to remember is CLU: Complex. Long. Unique.

This is where tools like 1Password and LastPass come into play, as they each have password generators. You type in the length, and it generates the password. You save the link, save the password, and move on with your day. Depending on how secure I want the password to be, I usually set length of the password (20 characters is always right) and decide on things like the inclusion of less usual characters like # or *.

‘123456’ isn’t a password. ‘qwerty’ is like writing your security code on your bank card. ‘letmein’; seriously? Shame on you. Even ‘starwars’ made the 2015 list of 25 most used passwords. Remember, you’re never as unique as you think you are…

Add Two-Factor Authentication

Even if you’re not using ‘admin’ and are using a strong, randomly generated password, Brute Force attacks can still be a problem. To address this, things like Two-Factor Authentication are key to helping to reduce the risk of such attacks.

The essence of two-factor authentication for is exactly as implied in the name, two forms of authentication. It’s the recognized standard today for enhanced security at your access points. You are already using two-factor authentication for Gmail, Paypal, and the works (at least you should be), why not add it to your toolkit as well

. Ipstenu (Mika Epstein) did an article on the subject you might want to read: Two Factor Authentication.

There is a plugin for that: Google Authenticator. An alternative that takes a slightly different approach for the same purpose is the Rublon Plugin.

Employ Least Privileged principles

The WordPress.org team put together a great article in the WordPress Codex regarding Roles and Capabilities. We encourage you to read it and become familiar with it because it applies to this step.

Concept of Least Privileged is simple, give permissions to:

> those that need it,
> when they need it and
> only for the time they need it.

If someone requires administrator access momentarily for a configuration change, grant it, but then remove it upon completion of the task. The good news is you don’t have to do much here, other than employ best practices.

Contrary to popular belief, not every user accessing your WordPress instance needs to be categorized under the administrator role. Assign people to the appropriate roles and you’ll greatly reduce your security risk.

Hide wp-config.php and .htaccess

It’s actually really simple, especially when you are using Yoast SEO for WordPress > Tools > File Editor to edit your .htaccess.

For better , you’d need to add this to your .htacces file to protect wp-config.php:

<Files wp-config.php>
order allow,deny
deny from all
</Files>

That will prevent the file from being accessed. Similar code can be used for your .htacces file itself, by the way:

<Files .htaccess>
order allow,deny
deny from all
</Files>

You can do it easily.

Keys and Salts work in conjunction with each other to protect your cookies and passwords in transit between the browser and web server. These authentication keys are basically set of random variables, used to improve security (encryption) of information in cookies. Changing this in wp-config.php can be simply done by getting a new set of keys here and add these. These keys change on a refresh of that page, so you’ll always get a fresh set.

Disable file editing

If a hacker gets in, the easiest way that he could change your files would be to go to Appearance > Editor in WordPress. To lift your , you could disable writing of these files via that editor. To do this Again, open wp-config.php and add this line of code:

define(‘DISALLOW_FILE_EDIT’, true);

But still you will be able to edit your templates via your favorite FTP application, you just won’t be able to do it via WordPress itself.

Limit login attempts

The attacks like a Brute Force attack, target your login form. Specifically for , the All in One WP Security & Firewall plugin has an option to simply change the default URL (/wp-admin/) for that login form.

You could also limit the number of attempts to login from a certain IP address. There are several WordPress plugins to help you to protect your login form from IP addresses that fire a multitude of login attempts your way.

Be selective with XML-RPC

XML-RPC is an application program interface (API) that’s been around for a while. It’s used by a number of plugins and themes, so we caution the less technical to be mindful how they implement this specific hardening tip.

While functional, disabling can come with a cost. Which is why we don’t recommend disabling for everything, but being more selective on how and what you allow to access it. In WordPress, if you use Jetpack you’ll want to be extra careful here.

There are lots of plugins that help you be very selective in the way you implement and disable XML-RPC by default.

Hosting companies simply see your website differently. There is no simple rule to decide on your WordPress hosting company. But the choice of a hosting company does matter when optimizing your .

All most Every article written on hosting or hosting companies seems to start by telling you that the cheapest one is probably not the best one. Most cheaper hosting plans won’t have support to help you out with a hacked site. These plans include little to secure your website, like for instance set up a Website Firewall. Shared hosting, for instance, does imply that your hosting server is also populated with other websites. These might have security issues of their own, which in turn might affect your own website’s security as well.

Be mindful of host account

One of the biggest challenges with hosts is in their account configuration for website owners. Website owners are allowed to install and configure as many websites as they want, and this fosters “soup kitchen”-like environments.
This is challenging because, in many instances, a website is compromised via a concept known as cross-site contamination in which a neighboring site is used as the attack vector. The attacker penetrates the server, then moves laterally into neighboring sites on the server.

Best way to account for this is to create two accounts, one which you treat as a production environment – only live sites are published – and a staging one, in which you put everything else.

Stay up-to-date always

Staying up-to-date is an easy statement to make, but for website owners in the day-to-day, we realize how hard this can be. Our websites are complex beings, we have 150 different things going at any given time, and sometimes it’s difficult to apply the changes quickly.

Updates need to extend beyond WordPress core. The same study shows that a very large percentage of the website hacks came from out-of-date, vulnerable, versions of plugins.

This can be compounded in really complex environments in which dependencies make it so that backups can’t be achieved. This is why we personally employ Sucuri’s Firewall. This firewall virtually patches and hardens our website at the edge. It gives us the time we require to go back and apply updates in a more reasonable time frame, allowing us to test in our staging environments first, and only then push to production.

(Free) plugins & themes

WordPress have a tendency to apply themes and plugins at will to their posts. Unless you’re doing this on a test server for the sole purpose of testing that theme or plugin, that makes no sense, especially not with reference to . Most plugins and a lot of themes are free, and unless you have a solid business model to accompany these free giveaways. If a developer is maintaining a plugin just because it’s good fun, chances are he or she did not take the time to do proper security checks.

How to pick the right plugin

Let us focus on the basics of plugin selection here. As explained above, free plugins and themes could be a possible vulnerability. When adding a plugin (or theme for that matter), always check the rating of that plugin. WordPress.org shows ratings, but one five star rating won’t tell you anything, so also check the number or ratings. Depending on the niche, a plugin should be able to get multiple reviews. If more people think a plugin is awesome and take the time to rate it, you could decide to use it too.
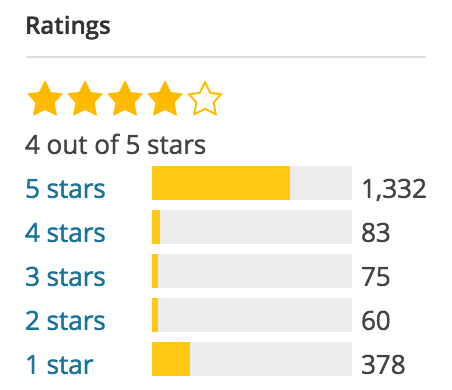
raiting1

Another thing you want to check is, If a plugin hasn’t been updated for two years, WordPress will tell you that. That doesn’t mean it’s a bad plugin, it could also mean there hasn’t been a need to update it, simply because the plugin still works. The ratings will tell you that, and the compatibility with the current WordPress version, which is also listed on the plugin page at wordpress.org.
compact2

Based on these ratings and compatibility, you could pick your plugins less random and have a larger chance of some kind of security being added.

Understand File and Folder Permissions

In the vast majority of cases, you shouldn’t need to mess around too much with WordPress defaults but it’s worth your while having at least a cursory understanding of file permission modes in general.

The two most common modes you will come across are 644 and 755. These are basically categories that determine the set of rules that govern each file or directory (i.e. who can read, open or modify files).

Files and directories categorized under the 644 mode can be read and written to (this is UNIX-speak for modified in any way) by their owner (the user on the server who created them) but only read by everyone else. This is the ideal setting for many types of files.

The 755 mode meanwhile is mostly used for folders since it allows all users to change into that directory. You’ll occasionally come across plugins that require certain folders to be set to 755.

File and folder permissions can be a head-melting topic if you are new to it but, if you remember nothing else, bear in mind that you should always avoid setting a permission mode to 777 – – even if a plugin explicitly asks you to – unless you know exactly what you’re doing.

This mode is basically a big no-no since it grants complete access to absolutely any user, allowing them to read, write to or delete directories at will and potentially cause all sorts of problems.

Backup, Backup, Backup

“Even through I walk though the valley of the shadow of death, I will fear no evil, for I have dutifully performed backups.”

Backups are such a simple yet crucial part of site security they should be preached as gospel.

In the unfortunate event of a security breach – catastrophic or otherwise – you’ll be enormously thankful you had adequate backups. Fail to get them in place in advance and the road back could be long and painful.

The only potential downside here is if you’re only performing backups semi-regularly where you risk potential data loss if backups are out of date. A weekly or bi-weekly backup should be more than enough for most websites and these can be automated through plugins so you don’t actually have to remember to perform them manually.

If you’re worried about maintaining a huge library of unnecessary backups, well, that could happen. But then again it’s 2015 – online and offline storage space are both ridiculously cheap and the cost involved is well worth the peace of mind it brings. Plus, you can always rotate the oldest snapshots out of storage once a set amount of time has passed to save on space.

Like Us on Facebook:  

Follow Us on Linkedin:  

If you are looking for a based company for your website design work, then you must contact us for a better web design deal. Choosing your based company really matters for your company web design work.

How to export contacts from outlook to gmail

By blog

Step-1.

If you need to account, it is similar to the preceding process. In Outlook, click on “File -> Import/Export.”

How to export contacts from outlook to gmail step 1

Step-2.

When the import/export wizard opens, select “export to a file” and then click “Next.”

How to export contacts from outlook to gmail step 2

Step-3.

On the proceeding screen, we want to select “Comma Separated Values” and click “Next.” This is going to give us a .CSV file just like when we exported our contacts in the last section.

How to export contacts from outlook to gmail step 3

Step-4.

Choose your contacts on the next screen. You might have to scroll through to find them, but they should be under your main e-mail account.

How to export contacts from outlook to gmail step 4

Step-5.

This last screen shows you what’s about to happen (“Export ‘Contacts’ from folder: Contacts”) and offers you the opportunity to map any custom fields you might have created in Outlook

How to export contacts from outlook to gmail step 5

Step-6.

What does this mean? Simply, some of the fields in your Outlook address book might not match the destination you’re importing to, which means you’ll need to “map” them. As the dialog explains, you need to drag the Outlook value right, to the field that most closely resembles it

How to export contacts from outlook to gmail step 6

Step-7.

Chances are you probably won’t need to mess with this, but it’s good to know in case you import your Outlook contacts and end up with mismatched fields. Regardless, when you’re ready to make the conversion, click “Finish” on the previous screen.

Now that you’ve got your .CSV file with all your contacts in it, it’s time to import into Gmail. Again, if you want open this up in Excel and do some quick editing, this is your chance.

How to export contacts from outlook to gmail step 7

Step-8.

When you’re ready, in Gmail, click on the “Mail” dropdown menu and select “Contacts.”

How to export contacts from outlook to gmail step 8

Step-9.

On the contacts screen, click the “More” button and select “Import…” from the selections.

How to export contacts from outlook to gmail step 9

Step-10.

Click “Choose File” on the import contact screen.

How to export contacts from outlook to gmail step 10

Step-11.

The open dialog appears; you know the drill, choose your .CSV file in its save location and click “Open.” When you’re back at the import contacts screen, click “Import.”

How to export contacts from outlook to gmail step 11

Your newly imported contacts won’t be merged into your main contacts – at least not in Gmail – instead they’ll get their own group.

How to export contacts from outlook to gmail step 12

Like Us on Facebook:  

Follow Us on Linkedin:  

If you are looking for a based company for your website design work, then you must contact us for a better web design deal. Choosing your based company really matters for your company web design work.

How to import contact from gmail to outlook

By blog

Step-1.

click on “Mail -> Contacts” in your Gmail inbox.

How to import contact from gmail to outlook step 1

Step-2.

Next, the “More” button and choose “Export…” from the dropdown selections.

How to import contact from gmail to outlook step 2

Step-3.

Notice, you can export a group, selected contacts, or all your contacts into one of three formats. The export format should be an Outlook .CSV (CSV = Comma Separated Values, which means each field [Name, Address, Phone, etc.] is separated by a comma) file.

How to import contact from gmail to outlook step 3

Step-4.

Note, you can open this exported .CSV file in Excel and manipulate it you like, such as adding addresses, phone numbers, e-mail addresses, and other information that will help round out your address book.

How to import contact from gmail to outlook step 4

Step-5.

While this is an optional step, it’s nice to be able to go through and make your contacts neat and consistent.

When you’re ready, it’s time to import your shiny new contacts file into Outlook. Click on “File” and then “Import/Export.”

How to import contact from gmail to outlook step 5

Step-6.

On the Open screen, click “Import/Export” and you’ll be shown a wizard dialog. You want to choose “Import from another program or file” and click “Next.”

How to import contact from gmail to outlook step 6

Step-7.

Now, choose “Comma Separated Values” and click “Next.”

How to import contact from gmail to outlook step 7

Step-8.

You’ll then be asked to browse for the file you want to import. Under options, you can decide whether or not you want duplicates to be imported.

We select “do not import duplicate items,” and click “Next.”

How to import contact from gmail to outlook step 8

Step-9.

The following screen will ask you to select a destination folder, which should be your Outlook contacts.

How to import contact from gmail to outlook step 9

Step-10.

Go ahead and click “Finish” on the last screen and your contacts will be imported into Outlook. You can see your results by opening the People mode.

How to import contact from gmail to outlook step 10

Now, you can go through and edit to your heart’s content such as adding images, mailing addresses, secondary phone numbers, and any other bits of information you think are important and relevant.

Like Us on Facebook:  

Follow Us on Linkedin:  

If you are looking for a based company for your website design work, then you must contact us for a better web design deal. Choosing your based company really matters for your company web design work.

View your google calendar in your outlook

By blog


Google Calendar is a great way to share appointments, and synchronize your schedule with others. Here we show you how to too.

Google Calendar

Step-1.

Log into the Google Calendar and under My Calendars click on Settings.

View your google calendar in your outlook step 1

Step-2.

Now click on the .

View your google calendar in your outlook step 2

Step-3.

Scroll down the page and click on the ICAL button from the Private Address section, or Calendar Address if it’s a public calendar…then copy the address to your clipboard.

View your google calendar in your outlook step 3-1

View your google calendar in your outlook step 3-2

Outlook 2010

Step-4.

Open up your Outlook calendar, click the Home tab on the Ribbon, and under Manage Calendars click on Open Calendar \ From Internet…

View your google calendar in your outlook step 4

Step-5.

Now enter the link location into the New Internet Calendar field then click OK.

View your google calendar in your outlook step 5

Step-6.

Click Yes to the dialog box that comes up verifying you want to subscribe to it.

View your google calendar in your outlook step 6

Step-7.

If you want more subscription options click on the Advanced button. Here you can name the folder, type in a description, and choose if you want to download attachments.

View your google calendar in your outlook step 7

That is all there is to it! Now you will be able to

View your google calendar in your outlook step 8

You’ll also be able to view your local computer and the Google Calendar side by side…

View your google calendar in your outlook step 9

Keep in mind that this only gives you the ability to view the Google Calendar…it’s read-only. Any changes you make on the Google Calendar site will show up when you do a send/receive.

View your google calendar in your outlook step 10

Like Us on Facebook:  

Follow Us on Linkedin:  

If you are looking for a based company for your website design work, then you must contact us for a better web design deal. Choosing your based company really matters for your company web design work.
How to Setup Outlook 2010 (POP3)

By blog

in few clicks

Step-1.

If you haven’t run Outlook 2010 yet, click Next to start setup and add your email account.

How to Setup Outlook 2010 (POP3) Step 1

Step-2.

Select Yes to add an email account to Outlook. Now you’re ready to start entering your settings to access your email.


How to Setup Outlook 2010 (POP3) Step 2

Step-3.
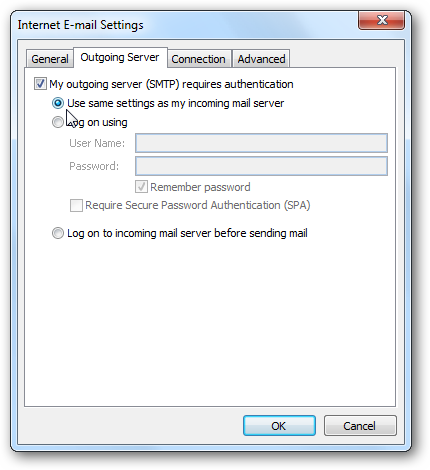
Or, if you’ve already been using Outlook and want to add a new POP account, click File and then select Add Account under Account Information.

How to Setup Outlook 2010 (POP3) Step 3

Manually Configure Outlook for Gmail

Step-4.

Select Manually configure server settings or additional server types and click Next.

How to Setup Outlook 2010 (POP3) Step 4

Step-5.

Select Internet E-mail and then click Next.

Step-6.

Enter your username, email address, and log in information. Under Server information enter in the following:
Account Type: POP3
Incoming mail server: mail.yourdomain.com
Outgoing mail server: mail.yourdomain.com
Make sure to check Remember password so you don’t have to enter it every time.

How to Setup Outlook 2010 (POP3) Step 6

Step-7.

After that data is entered in, click on the More Settings button.

How to Setup Outlook 2010 (POP3) Step 7

Step-8.

Select the Outgoing Server tab, and check My outgoing server (SMTP) requires authentication. Verify Use same settings as my incoming mail server is marked as well.

How to Setup Outlook 2010 (POP3) Step 8

Step-9.

Next select the Advanced tab and enter the following information:
Incoming Server (POP3): 995
Outgoing server (SMTP): 587
Check This server requires an encrypted connection (SSL)
Set Use the following type of encrypted connection to TLS
You also might want to uncheck the box to Remove messages from the server after a number of days. This way your messages will still be accessible from Email online.

How-to-Setup-Outlook-2010-POP3-Step-9

Step-10.

Click OK to close the window, and then click Next to finish setting up the account. Outlook will test your account settings to make sure everything will work, click Close when this is finished.

How to Setup Outlook 2010 (POP3) Step 10

Step-11.

Provided everything was entered in correctly, you’ll be greeted with a successful setup message…click Finish.

How to Setup Outlook 2010 (POP3) Step 11

That’s all you have successfully finished

Like Us on Facebook:  

Follow Us on Linkedin:  

If you are looking for a based company for your website design work, then you must contact us for a better web design deal. Choosing your based company really matters for your company web design work.